It’s that time of year again!
The Iowa All State Percussion Etudes are in year 10 of using custom written materials by Stan Dahl, Barry Dvorak, and Aaron Williams. Almost every Etude written back in 2014 has now been posted (there were a few repeats so we haven’t seen EVERYTHING yet) and it’s been fun to look back and see everything they made for us. Thanks, guys!
This year the etudes are not particularly difficult technically, but the challenge is in the quick tempi and tone control demands.
Cirone #20: from Portraits in Rhythm
As always with concert snare, I suggest learning the piece at 90% the marked tempo, which in this case in 65bpm. This means all your technical elements are the same at full speed and you don’t have to relearn anything when it gets faster. This also means you may need to practice in tiny slices of a beat or two at a time and put them together.
There are 3 marked dynamics ( p, mf, ff ). By assigning these to 3 zones on the head near the rim (p), halfway (mf), and off-center (ff) the drum itself will provide half the dynamic contrast through its resonance. This means you can play more comfortably and not need extreme stick angles, which will make the piece much easier to execute.
The whole etude is all about “gotcha” moments. The 9/8 to 3/4 transitions, the duple to triple subdivisions, and the spacing of embellishments are all designed to be awkward. The best process is what I call “batching”. Instead of playing the entire piece in order, pull out all the similar sections and master them as a set, then assemble them as written once you have an accurate and stable feel for each part.
First Batch: Line 1, Lines 5-7, Line 10. Put a metronome on the 8th triplet subdivision 195bpm. These lines are about a bouncing dance rhythm “3 | 1 – 3 | 1” etc and are generally light and quick.
Second Batch: Line 2, Line 9. Put the metronome on the 8th duple subdivision 130bpm. These lines have a heavy or choppy feeling compared to the 9/8.
Third Batch: All Embellishments from Line 3-4 and Line 8. Met on 195bpm. Every main note is on the same hand – probably right hand – for tone consistency. Embellishments (flams, drags, ruffs) all sound fuzzy at a distance, so a wider spacing is almost always better for clarity.
Remaining measures: 3/4 to 9/8 on Line 3 and Line 11. Count “1 2 3” before the 9/8 bars to prepare the timing transition. Play the final 7 notes of Line 11 as a 7-stroke roll LLRRLL R. It is much too fast for single strokes. The 5-tuplet is at 1080bpm, which is doable with a very light touch.
For Line 1: 6-note natural sticking (RLRLRL) puts every 8th note on the right hand, and generates a nice sticking all the way through. Ex: m1 R-RL R-RL RLRR | R. This is good for Line 6 and the start of Line 5, but won’t work all the way through.
For Line 5: Alternate sticking the whole line, which reverses the sticking after each triplet. The triplets should feel stretchy and wide – most people are coming in playing too tight, closer to a 32nd note.
Timpani: Etude #7 by Barry Dvorak
This piece is fairly simple to play, but has a great opportunity for clarity through color adjustment. I recommend the book The Artist Timpanist by Duncan Patton for the complete method, but I’ll describe what is needed for the etude here. I recommend keeping the metronome on 8ths for the entire piece. Most people are coming in learning the piece around 120bpm on the 8th (60bpm on the quarter) and speeding up from there. On timpani tone is ALWAYS first, so take your time.
The tuning is mostly perfect 4ths. Initial Tuning: using the drum harmonics, a high B will ring back when sung into the B and E drums, making them precisely in tune. Allowing the D to be slightly high (~16cents) as in Just Intonation gives it a pleasing and sweet sound. Retuning: a half step E-F, then perfect 4ths below C/F and G/C. To summarize: B/E, D … E-F, C/F, G/C. I do not use the key given by Dvorak suggesting that you tune a major 3rd and whole step as these are much harder intervals to tune than perfect 4ths. Tuning the drums off each other is always a better idea, as any errors will at least keep them in tune relative to each other.
Dvorak notes “Normal” and Center” sounds. Normal means the standard playing zone with the darkest tone and least thump sound roughly 3-4″ in from the rim. Center CAN mean dead center on the drum, but when multiple pitches are involved – as in this case – I recommend moving 2-3″ off-center so the hard impact sound also has a clear pitch under it.
I divide the first half into 3 colors: The straight 16th passages which start most lines get a bright tone played off the first finger with steep stick angles and sound like “Ti”. The Center passages are played flat to the head off the back fingers with a sound like “Too”. The 3/16 measures in line 3 are played with a feeling of weighty smoothness off the middle fingers and sound like “Da”. In isolation these sounds are very similar, especially “Ti” and “Da”, but in direct contrast they add a clarifying layer to the markings. The best way to practice this is to loop measure groups (Line 1, Line 2, Line 3, Line 4-5) refining the color adjustments until they are clear.
Important note: The dynamic does not change with the color, you can play a flat dynamic with color changes by listening and allowing the stick angles adjust. This is utterly different from marching angles, which can be a challenge to deprogram during this part of the year if you are conditioned to that style.
In the second half, the Dynamic begins at mf, so it’s ok to play up a bit. I prefer the rolls to have 3 notes per 8th note, but 4 is also possible. Short rolls are always a clean rhythm, so pick one that creates a smooth effect with the mallets you’re using. The repeating 16th lick at the end of page 1 needs to be clear, so this may determine which sticks you end up using. I use the sticking LRRL R, crossing on the last note every time this comes around. In the last measure I alternate RLRL R to keep the hands open on the louder notes, which requires a quick shift in the arms. I dampen the bottom drum on the last note, then dampen as indicated for a cleaner final sound.
Marimba: Etude #10 by Stan Dahl
Another 2-mallet / 4-mallet combo etude. I suggest a harder mallet for the 2-mallet portion, I’m currently using an MTech Hard from Malletech or a Round Sound 1 from Marimba One. This allows the high, soft notes to have an immediate, clear, focused tone, which many “medium” mallets will fail to achieve. The 4-mallet portion can be almost anything softer in both hands or even just the left hand. I have students using a range of medium to hard options and they all work just fine.
Set a metronome to 16ths to learn the first page. This helps with precise rhythm cleaning and allows you to leave it on through the mixed meters. Most people are starting between 200-240bpm on the 16th (50-60bpm on the quarter). Master it at low speed and gradually creep it up to full speed. You have plenty of time.
All rolls can/should be separated by an 8th note unless they have written slurs/ties. This is a common element of previous years etudes and very helpful in both phrasing and execution. This means many rolls will end up as only 4-6 notes at full speed, and that’s ok.
Use a light touch throughout, it’s going to get VERY fast so every motion will be small and quick by the end. In m8-13 the chromatic figures are far enough off your center that the accuracy can be an issue. I recommend a wide stance so you can lean your body over and keep those notes more directly in front of you rather than turning to face them at an angle.
Starting at m16, putting the left hand near the ropes and leaving the right hand further towards or in center will voice the melody and keep the repeated low note from washing it out. This makes shaping easier and keeps the sound clean.
For page 2, note that m35 feels faster than m33-34 due to the subdivision switching from 8ths to syncopated 16ths. The base sticking is R LR LR starting at m39. Practice playing one hand while tapping the rhythm of the other, and then reverse it to lock in the pacing but ease the note demand. Once the initial learning is done, this page is pretty smooth.
The chords in m52 turn the hands very fast. I find leaning to my right foot and releasing the weight off my left on the &-of-4 allows me a smooth and accurate turn with minimal body motion.
Tambourine: #1 by Aaron Williams
Quick and technical. There are many ways to play it but I’m suggesting and demonstrating something simple. The “sticking” concept for the 16th notes is like Natural Sticking, where every 8th is played on the right hand but now the left hand notes are played on the leg. To match the tone, play directly on the rim with the fingers and the knee, and find a place on the knee where the tone matches the fingers.
Finger/thumb rolls can be played with any finger, experiment and find what works for you. Generally, you want to anchor the middle of a finger with the thumb and let the last digit skip lightly across the head. The finger/thumb can be very steeply angled to the head – people often have trouble because they are too flat and just slide on the surface.
Crash Cymbals: #1 by Aaron Williams
I suggest learning this in dynamic layers. Master the entire thing at the lowest dynamic, getting all the dampening and lengths exactly like you want them. Then leave the lowest dynamic the same and play all higher dynamics at mp. Continue adding one layer at a time until you have clarity between each level with the same quality execution. This makes it easier to identify what to focus on, and gets you a great balance of consistency and flexibility. Don’t wait until the last week to do this, work on it 5-10min as often as you can.
It’s that time of year again!
Iowa All-State auditions are coming up and I have example videos to help percussion students prepare and think about their preparation process. These videos aren’t the only way to play the etudes, but I think they represent a good option for students.
GUIDING QUESTIONS
I have two friends who play at the MET, Rob Knopper and Jason Haaheim. Both of them are great musicians, not because of some magical in-born talent, but because they work like crazy and have brilliant practice philosophies. I distilled and organized these Guiding Questions from a lot of their work and advice, and have found them to be a powerful tool in my own teaching and practice.
As you read through here, I suggest you test every suggestion with a recorder. What’s good for me isn’t automatically good for you, and you have to make YOUR recording sound YOUR best.
For my complete online lesson program, check out Dan Krumm Percussion Academy, where you can get ALL my standard training videos and worksheets for free!
Snare Drum: Cirone Portraits in Rhythm #39
Timpani: Etude #8
Marimba: Etude #9
Tambourine: Etude #4
Crash Cymbals: Etude #7
After two years of working with the Teach:able platform, I decided to move my Percussion Academy Videos and Worksheets to my original online home here at WordPress. My goal is always to SHARE with teachers and students, and although I learned a TON about how to effectively do that through Teach:able, I think I can do it better here.
You can get to the new page by clicking the Dan Krumm Percussion Academy link here, or on desktop, the logo on the right side of this Home page. Once you’re there, you’ll find buttons to explore each topic area.
Feel free to share anything you find here as you like! I’m constantly updating the content as I learn and grow, and this is the primary resource I recommend for all my students outside our normal lesson time. Everything is on YouTube also, so you can share playlists and click around there as well.
Happy Practicing!
It’s that time of year again!
2020 has been a lot, and seemingly everything has been affected. HOWEVER, some of the changes we’ve been forced to make this year may turn out to be a good idea to hang onto. In particular, I’m thinking about the changes to this year’s Iowa All-State process.
Auditions are virtual!
Over the past ten years, many professional orchestras and university programs have been adding a recorded audition round to their application process. This has been GREAT for several reasons.
- Committees and organizations save time and money, knowing the applicants invited are all highly qualified, and they won’t have to listen to underprepared players.
- Applicants save TONS of $$$ on travel expense, knowing they are mostly invited to auditions they have a real chance of winning or advancing in.
- Players themselves are challenged to submit the greatest, most refined recordings they possibly can, which drives them to listen deeper and refine their preparation beyond what they might have otherwise.
This last one is the MOST IMPORTANT. The rising tide of audition competition these past ten years has been intense, because the musicians who embrace self-recording for pre-screening rounds and daily practice grow SO FAST compared to those who do not.
It is my personal hope that you (students AND teachers) experience an incredible level of growth from participating in this year’s audition process, and that we all become advocates of self-recorded practice in the future.
-end rant-
This year’s percussion etudes are pretty straightforward. I have example performances on my YouTube channel HERE, and they will be embedded below. I also have a video on self-recording and practice methods to prepare for it, which I’ll discuss more below as well.
INTRODUCING OVERLAYS
This year I made some overlays of my notes for each piece. You can print them directly onto copies of your music, or onto transparency, or copy them onto a plastic sleeve, or whatever. I strongly encourage you to check them out, and use them as a model for how to add notes from others or from your own practice to your music.
INTRODUCING GUIDING QUESTIONS
I have two friends who play at the MET, Rob Knopper and Jason Haaheim. Both of them are great musicians, not because of some magical in-born talent, but because they work like crazy and have brilliant practice philosophies. I distilled and organized these Guiding Questions from a lot of their work and advice, and have found them to be a powerful tool in my own teaching and practice.
As you read through here, I suggest you test every suggestion with a recorder. What’s good for me isn’t automatically good for you, and you have to make YOUR recording sound YOUR best.
Snare Drum: Cirone Portraits in Rhythm #18
This is one of my favorites. It has a few of my favorite snare drum tricks and the tempo is just right for all of them.
Right away the accented fp roll has a great trick. Cirone gives you a hint later, in line 4, that this roll is two accented 16th buzzes, creating a wide, dark accent in contrast to the light, staccato notes which follow. I play the staccato notes mostly on the left hand, as indicated in my overlays, because I like the consistent tone and the way it looks like it sounds.
In line 2 I suggest the crescendo not quite make it to the level of the roll so there’s a bit of a pop as in the beginning. The quarter roll in this line is NOT like the 8th rolls up to this point, and I play it as a triplet, accented only on the first note.
ROLL SUGGESTIONS. Time for math.
The human ear blends individual sounds together between 1200-1300 bpm. The optimal arm speed for rolls is between 360-540 bpm. Ideally, you want:
[(tempo x subdivision = 400-500) x (3 or 4 bounces/hand) = 1300-1800]
In this piece (160 x 4 = 640bpm) so that’s a big NO, but (160 x 3 = 480) and that’s a good, quick arm speed for rolls. “But wait! what about the 16th rolls at the beginning!”. Those are single buzzes on each hand, NO arm alternation. They are more like an articulation on a down stroke than a sustained roll, so they work just fine.
Complete equation: (160 x 3 = 480) x (3 bounces) = 1440. Win.
Go down to line 6, this is where you may have an issue. Either you use the above math and play the quarter rolls as triplets OR, you play the rolls as 16ths with very, VERY fast arm motions. The triplet option makes for some tricky counting and potential distortion of the pulse in an already strange passage. The 16th option requires an extremely light and loose feel to avoid sounding oddly emphasized or tense. Test both options side by side for a week or more before deciding.
Now down to lines 8/9. Here’s my favorite trick of all time: Flex rolls💪. The accented pickups in this passage are 16th double-accents like the beginning. They are followed by a triplet roll with no terminating sound. That means the first roll is: two accented 16ths, triplet on beat 1, a single note on beat 2, leaving a slight gap before the next roll. The counts would be, “&a tri-pl-et 2” (or “taka ta-ka-di ta” if that’s your thing).
The trick now is to smooth the sound out so it’s not clear that we’re playing different rhythms through the roll. Still counting the rhythm, widen the 16ths and compress the triplet after the beat slightly to “flex” the rhythms into each other. When you have it right, you can count the exact base rhythm, feel the flex, hear the smooth tone, AND stay lined up to a metronome on 8ths to clean the start of each roll.
Before you dismiss this as being *way too complicated and strange*, get the base subdivisions into your hands and give it a try for about a week. This is the single best roll trick I ever figured out and I promise if you sit with it for a bit you’ll understand why.
Line 10 is the last different roll thing in the piece. If you think of it as 3+3+3 it makes more sense than how it’s notated. In each set of 3 counts, the first two are a triplet, and the last is a single buzz (tap on the last note). Instead of getting hung up on where the downbeat is, stay focused on the smooth, even alternations. In 3/8 time it would be “Tri-pl-et 3” over and over. Alternatively, you could play it in 16ths, but at the given dynamic it’s pretty intense and I can’t recommend it for the sake of good tone.
The rest of the piece is application of the above concepts. I can recommend assigning dynamics to positions edge-center on the head to separate the dynamics by resonance as well as volume.
Timpani: Barry Dvorak All-State Etude #5
The trick here is three elements right next to each other:
- Long rolls with crescendos that need a smooth sound
- Short Rolls that are actually just a rhythm, but are still smooth
- Fast notes that have to be obviously clearer than the rolls
There are two tricks that combine to make this work.
First, timpani heads are big, they ripple like a pond. Most of the ripple bounces off the round sides in all directions, but one spot straight across from your hand reflects directly back. When your hands are close together, the ripples which reflect directly back will cancel out your next stroke frequently, making for a more articulate sound. When your hands separate about 8″, they no longer cancel each other out as often, and the sound is smoother and more blended.
Second, mallets have a 10-15º tilt range. Played on the “equator” they have a more articulated sound. Angled towards the top of the mallet, the sound is smooth and warm. WARNING, too far and they “chiff” as they scrape on the head. Record and listen carefully to calibrate just the right position on every mallet you use.
Put these tricks together and you can get a lot of separation in your sound. All rolls are played 8″ apart and angled for the warmest, smoothest sound. All non-rolls are played close together on the “equator” of the mallet for the clearest, articulated sound.
On my overlays you can see the combination of stickings and roll subdivisions I use. You can go slightly faster than my suggestions, but the risk is always a pinched or choked sound. Roll speeds in the 700-800 range (tempo x sub division) are ideal.
Counting the 5th line while tuning. I change the meter partway through so I count in triplets for 2 bars, then in 8ths. The meter change at the end means the 8ths I’m counting become the quarter pulse. That seems to make it easier. I tune on the beat, and practiced with a gauge first to get the feel of where my feet go. After a few successful repetitions, I took out the gauge and let my feet go where they wanted, then checked them on a tuner after. They missed a few times, then I identified my tendencies to be high or low and adjusted. After about an hour, I never missed it again.
Tuning is not a chore we have to get through to get back to drumming. Tuning is just part of the thing. Be good at it. Practice tuning, and set up your practice so you have to retune a LOT. You’ll be really good at in a short time.
Marimba: Stan Dahl Etude #5
This etude has two difficult elements throughout
- The chords and hand positions are VERY similar, and it’s easy to miss the *one* note that changes from beat to beat
- The markings are minimal, and the player has to add a lot of phrasing and inflection to complete the piece.
My overlays include chord symbols, which show not only WHAT the chords are, but WHERE they are, to help train your eyes to look for the note changes. I suggest blocking every bar: playing every note in the chord at once to get the physical layout while playing the written subdivisions. You’ll find the hand and body movements you make to get in position are easier to remember than the individual notes, and form an underlying layer of memorization that’s make everything way easier.
My overlays also include recommendations for phrasing. I won’t go over them all here, but the process is the main thing.
- Learn the notes to a metronome so you have the space between them well-conditioned
- Loosen up and turn off the met. Set up a few phrase ideas and practice them to a recorder, allowing yourself to flex the time however feels good
- Listen back for your favorite versions. Some will sound AWFUL. Just make a note not to repeat that and stay focused on what you like.
Learn – Loosen – Listen
Some of the notes are pretty quick. Get them successful at a slow tempo, then gradually speed them up over a few days. Play at a low tempo until it’s successful, then go up ONE click and repeat.
ex: target is 110, success is at 70. Day one: 70-80, Day two: 75-85, etc …. until you get to Day eight: 105-115 and you have slightly more capacity than you need to easily execute the passage. Using this method you have 88+ successful repetitions (at least 11 per day), consistency and probably memorization as well.
Self-Recording and Practice Method: by Dan Krumm
The video is pretty dense. I recommend watching it several times and making notes to yourself. If you’re into this approach, definitely check out Rob Knopper and his online course to get a deeper look.
When you set up your recording gear, take a couple runs and listen back for room noise and overall dynamic contrast. You typically cannot take out background noise on simple equipment without messing up the sustained tone of your instrument or voice. I typically take 10-15min to get the camera angle and audio settings right in a new room, then I write them down in case I need to come back. If you’re using extra lights you’ll want to write down those settings as well (I didn’t do that with my new lights and paid for it on a reshoot for this video… I bet you can tell where)
As always, I’m happy to go more in-depth and answer questions if people have them. Best of luck to all students and teachers this season, I hope you find this self-recording process as fulfilling as I do!
The Percussive Arts Society International Convention (PASIC) just wrapped up in Indianapolis today! This was roughly my 15th trip to PASIC since 2002, and had a ton of great performances and clinics, as usual. Here are my personal highlights, which represent about 10% of what actually happened, because the schedule is just that packed with incredible events.
Raymond Curffs Timpani Clinic – Raymond is a European timpanist born in Holland, trained in several German schools and has held positions in several different European orchestras. He had a student from Curtis Institute with him, and they both played to show the contrast between American and European playing. I’m very excited to see how the various schools of American and European timpani continue to combine over the next few decades.
Jeremy Branson Orchestral Aux Clinic – Jeremy presented a ton of nuanced options for instruments in the orchestra. Some of my favorite takeaways:
- Add a base board to sleigh bells. Remove the bottom bell or attach strap pieces to a piece of wood if needed. This allows them to stand up so they don’t make noise when picking them up.
- Castanets ALWAYS means “So. Many. Castanets”. Double, triple, quadruple up with multiple castanets for a way more authentic sound.
- “Horse hoof sound” play on granite blocks with coconut shells. It sounds awesome, so much better than just rubber mallets.
- Guiro: Different grooves/scrapers for different sounds. Parts are less than half written, have to be finished by adding inflections from the rest of the ensemble.
Joe Petrasek Orchestral Phrasing Clinic – Joe is Principal Percussion at the Atlanta Symphony. He has a great approach to score study and inflection, which basically comes down to adding the missing markings into keyboard parts from the winds/strings and then learning how those players interpret the markings. He demonstrated this on glockenspiel, xylophone, and vibraphone, and finished by playing a Piazzola tango etuse in unison with his wife, a professional flautist, which was just incredible.
Expo floor – This year I found two incredible new things: A remake of the 1960s Galanti Vibraphonette by Malletshop and new custom mallets by Gordon Stout. I’ve been playing my original Vibraphonette in musical theatre pits for about 10 years and I cannot wait to upgrade to this new, much better 2.6 vibraphone. The bars and motor are so much better, and they added an option to include a pick up system for a Direct Line out. As for Gordon Stout’s mallets, they are just fabulous. One of his lines has rosewood cores, another has an underlayer of felt which plays in like a timpani mallet, and the third is made like Wave Wrap mallet, and has an incredible direct sound. There are numerous handle options, and the cedar handles have a flexibility halfway between birch and rattan, which feels great.
I had a great time this year and I’m looking forward to 2020 already!
It’s that time again!
All-State auditions are coming up fast and I have example videos for the percussion requirements here. I have my collected thoughts on execution below, with the individual videos embedded in each section.
Snare Drum: Cirone Portraits in Rhythm Etude #3
This is pretty straight forward, and the study guide version has some good advice on interpretation.
Line 2: sfz is not an accent. It is emphasized within the dynamic, feeling larger, with bigger resonance, not just more volume. Add more weight than height and emphasize the first 2-4 notes before the decrescendo.
Line 3: The slow tempo/fast rhythm trick. Rewrite without the top beam to see a simpler rhythm of triplets and 16th groupings if needed. The triplet in the last measure feels more like a quarter note triplet, very wide. I play the triplet all on the right hand by practicing with an alternating 6-tuplet first, then taking out the left hand.
Line 5: The last bar buzz rolls could have a base of 32nd notes, but I find that too frantic. If you sing it as short and long notes with proper rhythm, filling that space with smooth buzz sound is the goal. I use a triplet base on the 8th note, then 5-tuplet base on the dotted 8th note. That feels and sounds smoother to me, though it takes a little extra time to master the underlying rhythm.
Line 6: Grace note groupings of four notes. Because Cirone prefers all rolls in his etudes to be executed as buzz rolls, this is his way of notating open rolls. They are to be executed like a 5-stroke roll RRLLR.
Timpani: Etude 1 by Barry Dvorak
Short, compact etude. The tricky spots come one after the other very quickly. I recommend starting at the end of each section and working backwards, so you’re always adding the least amount possible to what is already working.
Tuning song: The stacked 4th tuning at the beginning is an opportunity to really, REALLY get the drums tuned well. Math time. I suggest a tuner app like ClearTune or Tonal Energy Tuner, not to get the pitches, but to check your work so you learn faster how to tune for yourself.
- Timpani (even bad ones) will sing back the pitch they are, the octave above, and the 5th between them. For the low drum that’s G# D# G#.
- For the middle drum that’s C# G# C#. The SAME high G# will tune both the bottom and the middle drum.
- Bend in close to the middle drum. Sing high G# (5th above) and pedal up. It will sing back when the drum is at a C# because of science 🙂
- STAY BENT OVER. Take a breath and sing that G# again, checking your pitch. Move to the low drum, Sing the same G# and pedal up. It will sing back when the drum is at low G#.
- At this point if the drums are out of tune, it’s because you need to practice doing it and really hearing when they sing back the best.
- Tap the middle drum to get a C#. The top drum sings back F# C# F#. Bend over, sing C# into the middle drum to confirm the pitch, sing C# into the top drum and pedal up. It will sing back when it’s at F# because of science.
To summarize: High G# tunes the bottom drums. The C# from the middle drum tunes the top drum. Get good at this and you will be very in tune.
After this, the tuning change requires a quick song: in sol fege Re-Mi Sol-Le or in scale degrees 2-3 5-b6. That’s the tuning change on the low drums. It’s an augmented triad and sounds funny, so practice singing it with a marimba or piano to get the notes exactly right.
The first four bars are almost a mirror image of each other. The trick is getting from the rolls to the rhythms after. In m2 I play two 6-tuplets on the roll, accenting the first two notes for a wide fp sound. In m4, however, I play a 7-tuplet on the first beat of the roll, then 5 notes of a 6-tuplet after. This makes it the same number of notes overall, but leaves a subtle gap to get to the middle drum with good tone and stay in time.
Usually, I would try to do some kind of dampening from m4 into m5, but in this case I use a mallet with enough articulation that the p notes aren’t completely lost and allow the middle drum to decay naturally.
The rolls in m9-12 can have a slight gap between them. The drums themselves resonate more and more on the way down, so minimal effort is needed to make the dynamic changes. The last dynamic increase to f needs more from the player, since the drum stays the same.
The tempo/meter change is tough, but there’s a trick. The 16th note from the first part and the triplet 8th from the second part both equal 456bpm. That means the 8 bars of rest can be counted in 3/8, then 6/16 to establish the quarter pulse in the 5/4. It counts like this:
1&2&3& 1&2&3& 1&2&3& 1&2&3& 123123 123123 1- – 2- – 1- – 2- –
In that time you need to mute the drums, switch sticks, and retune. I suggest doing it in that order.
The second half is pretty straightforward. Count beats 4 and 5 carefully in rests. I cross-stick the 2nd measure in ff on count one, and the same way in the final measure. I also start the last line with my right hand and cross-stick the next to last note in that bar. Almost this entire second half is alternating sticking, so I can focus on my tone and dynamics.
Keyboard Etude: Stan Dahl Etude #4
This year’s keyboard etude uses some exotic scales. It’s worth learning at least two of them before working on the piece.
The first scale I’m calling E phrygian dominant. E F Ab B C D E. Phrygian for the half step it starts with, Dominant for the major 3rd and flatted 7th scale degrees. You’ll notice there’s no G in the scale. That’s because there are two minor 3rds in a row, F-Ab-B, and the G note is G#, which in this piece is always written Ab. This scale and the arpeggio E G#/Ab B D are the basis for most of the material in the piece. There are a few other scales used around these notes, but they just bridge these notes together. Be careful of skips, especially in line 2.
The second scale is C whole tone. It’s all whole steps C D E F# Ab Bb. This forms the rest of the material in the piece. Be careful that F#-Ab shows up a lot, looks like a 3rd, but is actually a 2nd.
Dynamics in this piece are tough, as the ranges are really wide, and you’ll need a small, harder mallet to get the high notes to sound good. I decided to assign an affect to each dynamic, so there’s an expressive concept as well a volume level. f-emphasised mf-lyrical mp-subtle p-mellow pp-vanishing. This helped me give each moment context and contrast when volume was hard to work with.
m16: the sticking RRL is pretty obvious. I also use this sticking in m20/21, when the Ephry/dom chord comes back in the inversion 7135. This allows for a better crescendo, I think, than alternating, because the notes get tangled up very easily.
m22: Careful reading the ledger lines. Right hand Ab/F#, Left hand E/D and D/C.
m26: So fast. It starts at p, and the stroke speed alone with make it crescendo. No extra energy, just learn it slow and let it speed up on it’s own.
m30: Ideokinetics is a book/concept by Gordon Stout employed here. Basically, stare just above the middle E and learn to feel the position of the other notes.
m36: count out loud with a metronome while you practice picking up mallets and playing dynamics. I suggest putting a towel starting on the low C bar as a “tray” for the extra mallets.
The second half start at m44 is mostly rehash of the same scales with new sticking/dynamic issues. Characters assigned to dynamics are very helpful here in separating the levels.
m65: If you use a metronome (do that), you’ll notice how the piece crashes into the last line and slows abruptly. Sing the ending over and over until you feel strongly about how it should go. Playing an ending like this with musical conviction is better than trying to find the “right answer”. People will play it differently, and that’s fine. Be confident in your version.
Tambourine: Aaron Williams Etude #6
Pretty tough. Pretty fast. There are several ways to solve it. I used a lot of hand techniques instead of knee/leg techniques. Go slow and get the rhythms right first.
m3: I count the 8th notes. 1 2 off 1 2 3 off 1 2 3 4 5. I flick off the side on the releases. I like this as a non-aggressive release.
m4: I use a heel/toe type motion like in Brazilian pandiero playing. It works as a knee/hand motion as well.
m9: I don’t have a great solution for shake roll dynamics. Place the music stand between you and the judge so you can show the crescendo and the stand can block some sound when it’s softer.
m10: Too fast for me to do anything but knee/hand. I knock with my knuckles on the marcato accents. It’s not louder but the color change makes it seem that way.
m12/13. I cover more area on the loud finger rolls, and less as they get softer. It’s like string players using bow speed instead of pressure. Stay light in your touch.
m15/16: Rhythm is meant to trip you up. Count very carefully.
Crash Cymbals: Aaron Williams Etude #6
The tempo says quarter note = 120, but the piece is written in 6/8. The beat is dotted quarter = 90. It’s not really playable at 120, as you would quickly discover.
I simplify this down to three dynamics first: f mf p. Play the whole thing slowly with only these levels, no accents and no dampening. When you can do that, add the dampening. Finally, add the accents.
Personally, I play non-accented notes 90% with my top hand. When I add the accents, I use a heavier drop in the top hand and help more with the bottom hand. This lets me play consistently with my top hand, and use the bottom hand to modify that sound, which is the whole point of added articulations.
As ff and pp are only single notes or the beginning/end of a crescendo/diminuendo, I don’t consider them “real” dynamics, but rather modifications of my simplified 3 levels, the same as accents. Record yourself and listen back to see if you’ve done enough with them to make the music make sense, but don’t agonize over making a separate resonant level for them.
As always, if you have questions or helpful suggestions I didn’t include here, feel free to ask/share! Happy practicing!
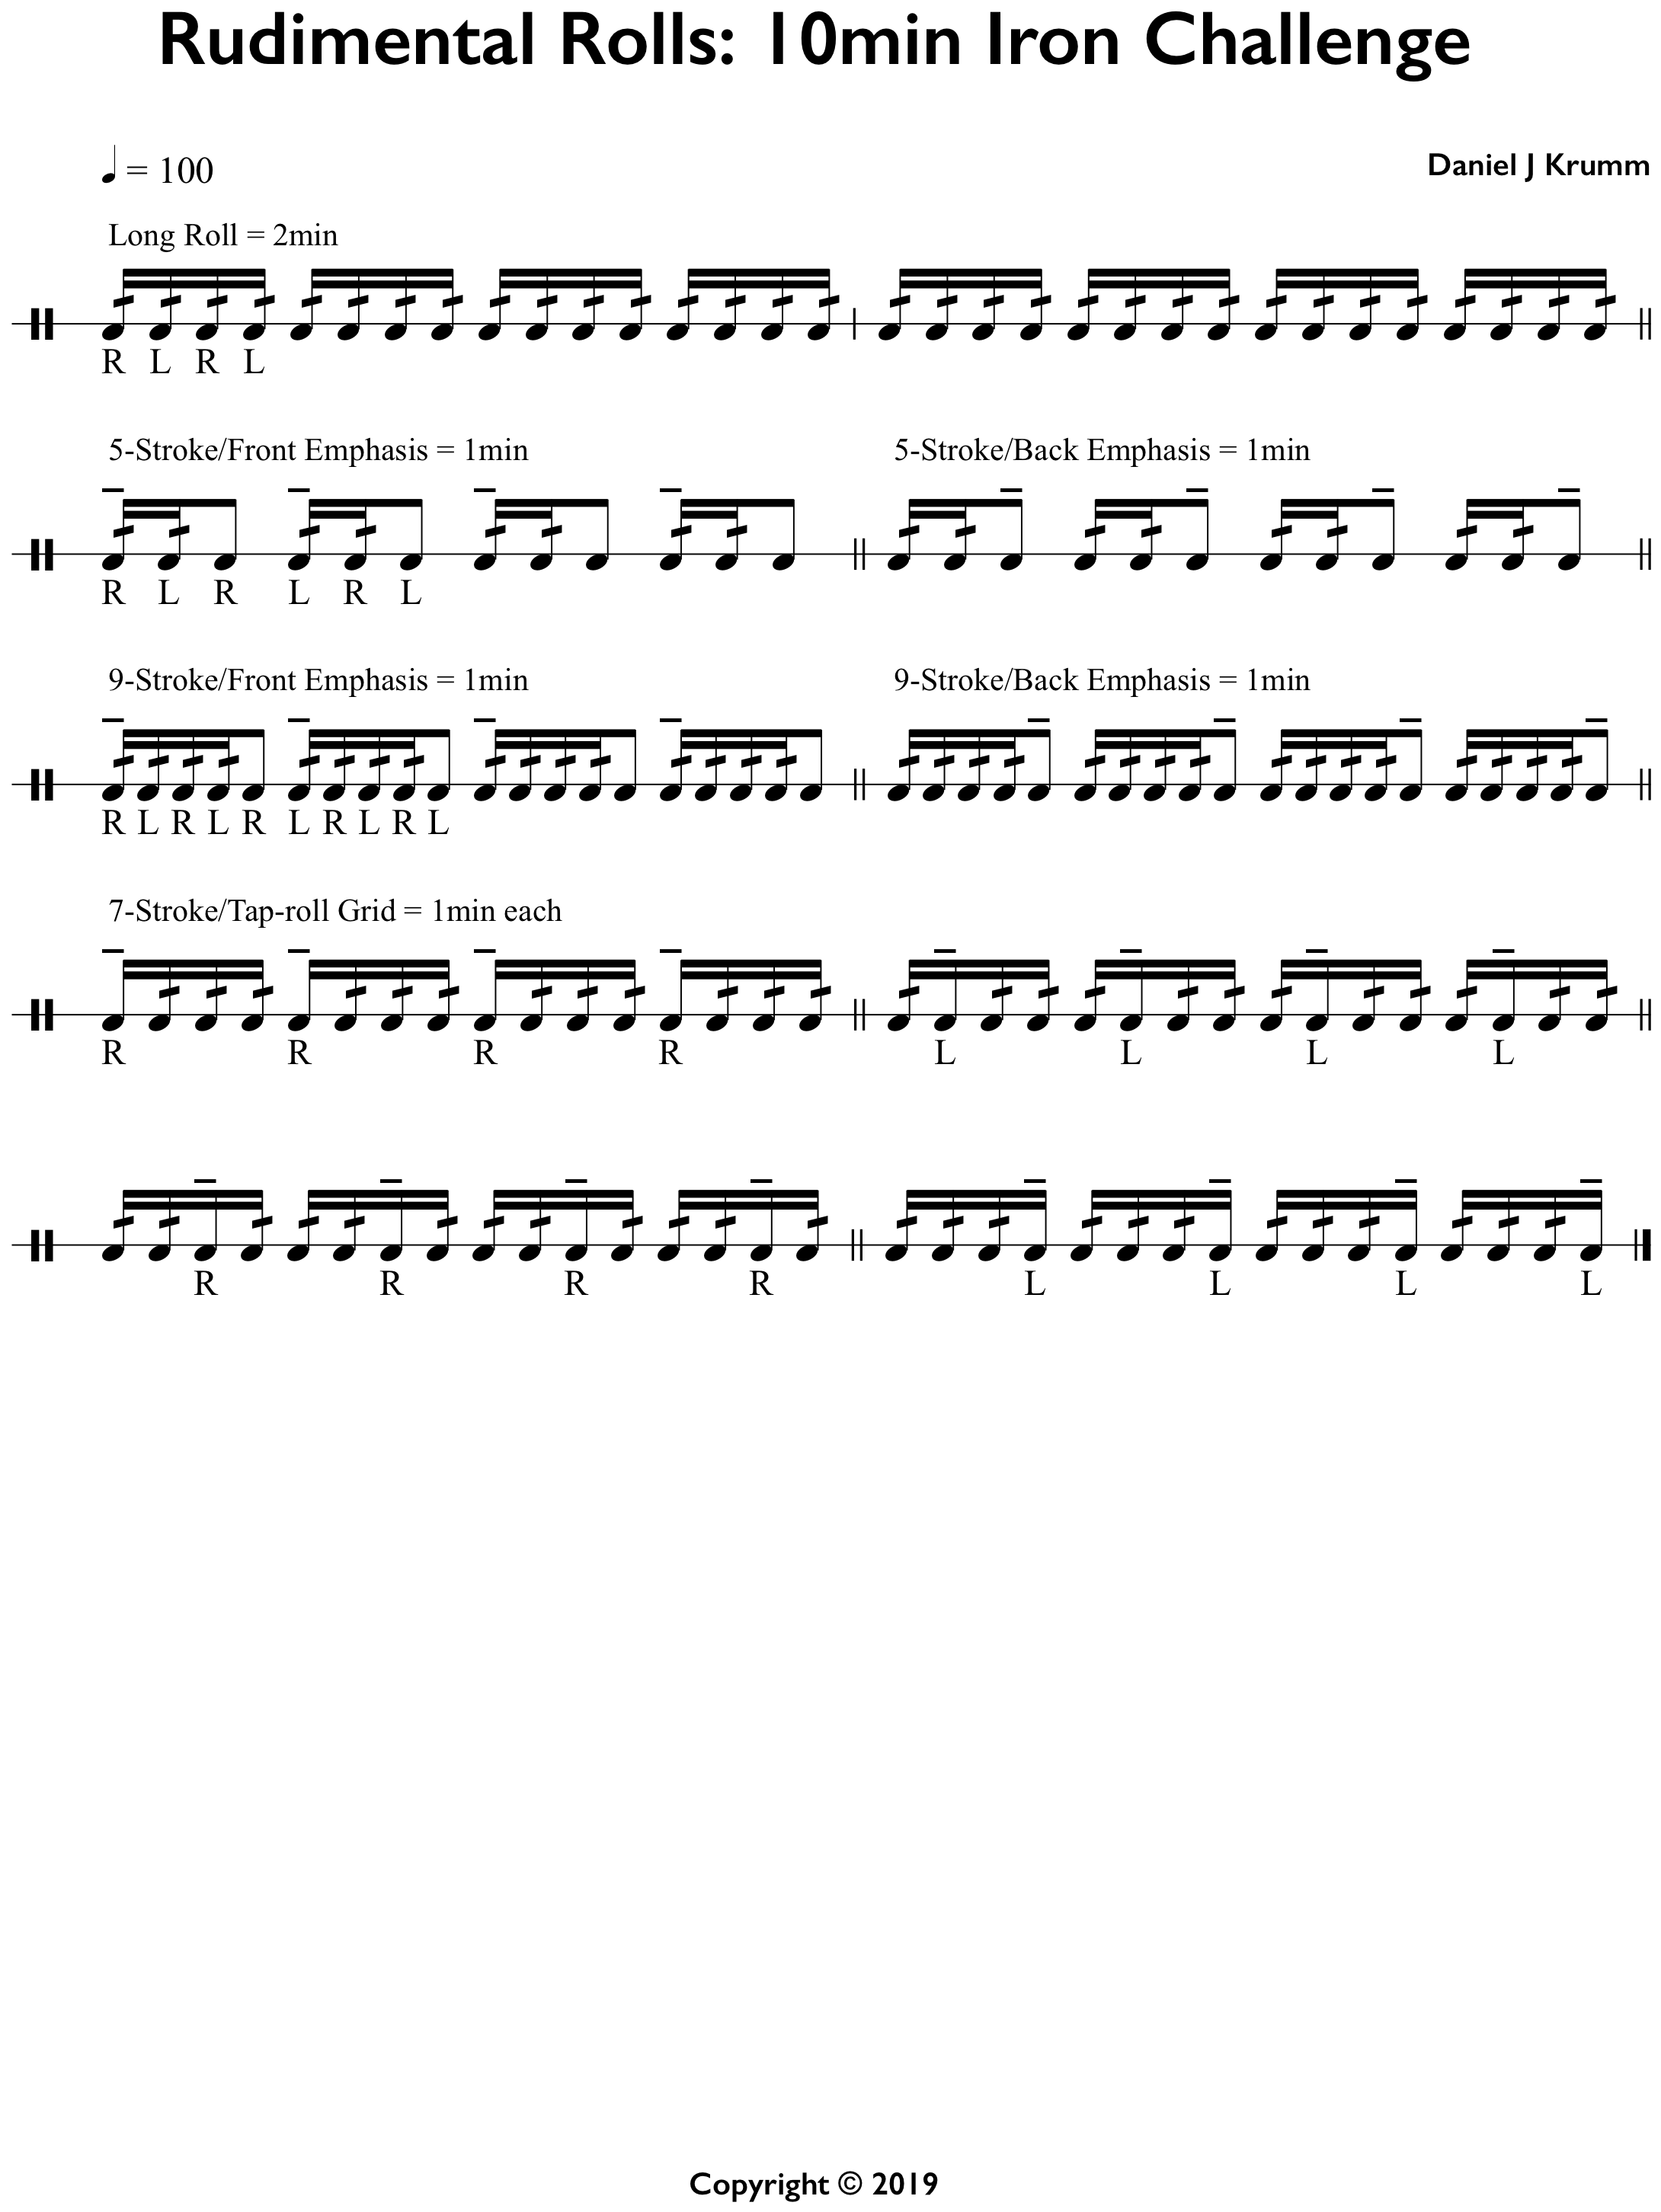
In 2013, I organized and posted my Rudiment Champion list and supporting exercises. After teaching and practicing this material for many years, I came up with an endurance test for 2-bounce rolls. The goal is to play continuously, through several variations, increasing in complexity, for roughly 10min. Success requires unlocking a virtuous cycle of alignment and capacity, where improved strength allows for more refined control, which leads to a better targeted development of strength, and so on.
Here’s the complete routine written out. Tenuto notes could be accented at any dynamic or simply emphasized with arm weight.
This post is about a composer whose music I grew up with in the Lutheran Church, and recently revisited with fresh ears: Marty Haugen
Marty Haugen writes and plays a lot of music in the Lutheran Church. I will be focusing on his setting from 1990, “Now the Feast and Celebration”, which I grew up singing from grade school. The setting loosely follows a traditional Mass Ordinary, with additional pieces between readings, offertory, and communion. What I really want to focus on is his blending (in my view) of numerous writing styles, creating a 20th century setting grounded in the writing of much earlier time periods.
First, a brief breakdown of styles employed:
Psalm Tones: Traditional reciting tones, often employed in the singing of psalms or prayers. These appear across time periods since the 800s in various forms. In Haugen’s setting, they are employed in a traditional call-and-response, with or without ensemble accompaniment.
Modes: Scales such as Mixolydian and Aeolian, seen in church music as far back as Gregorian plainchant of the 800s, as well. Versions of these scales are also used in modern jazz and popular music, which the composer utilizes to bring the sounds of both time periods together.
Modal Interchange: Related chords are frequently spelled within the notes of a single scale. For example, in C major, chords are all spelled without sharps or flats. A modal interchange switches to a parallel mode, in this case C minor, where related chords would now contain the flats Eb, Ab, Bb. This is a very dramatic and emotionally charged way to write. It is most commonly employed in Jazz, and in the pop music of Stevie Wonder, but historical examples include the “Picardy 3rd”, which is said to arise in the Renaissance era.
Renaissance Dance: The meter of the title piece “Now the Feast…” is 6/8 and highly reminiscent of the Galliard, a widespread dance from the 1500s. In addition, the score indicates a woodwind ensemble in C (Flute, Oboe) and the addition of clarinet and bassoon is extremely effective. Although the music is not traditional to the time period, the affect is clearly similar.
American Folk-Rock: The composer is a singer-songwriter and guitar player. All of the works in this setting have optional acoustic guitar parts, and the composer’s own performances have a strong affect of 1960s-70s American popular music. This is intended, in the words of the composer, to aid listeners in “hearing their established texts and music with new ears”. This statement, to me, establishes the composer’s intent in blending style periods.
Now, an analysis of some music segments and how Haugen combines the above elements:
Kyrie: Aeolian setting of psalm tones. Generally a traditional minor sound, the frequent use of the flatted 7th scale degree in this mode gives it the “old church music” feeling. This is consistent with other short pieces in the setting. The ending, however, has the first example of modal interchange, utilizing the “Picardy 3rd” to shift from E minor to E major on the final chord. This is a structural segue as well, with the next piece in E major.
“Now the Feast and Celebration“: Title song. This is an alternate Gloria setting, replacing the traditional text with a more modern one as per the composer’s previously stated intention. There is a lot going on all at once in this piece. First, the Neo-Renaissance galliard dance feel is consistent throughout. Next, the bass lines are very smooth guide-tone lines, showing a pop/jazz influence in contrast to chorale/hymn settings. Finally, elements of other time periods arise in moments of text-painting or coloration.
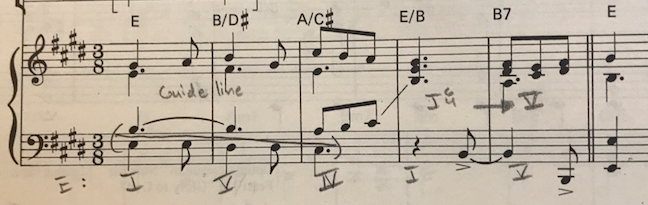
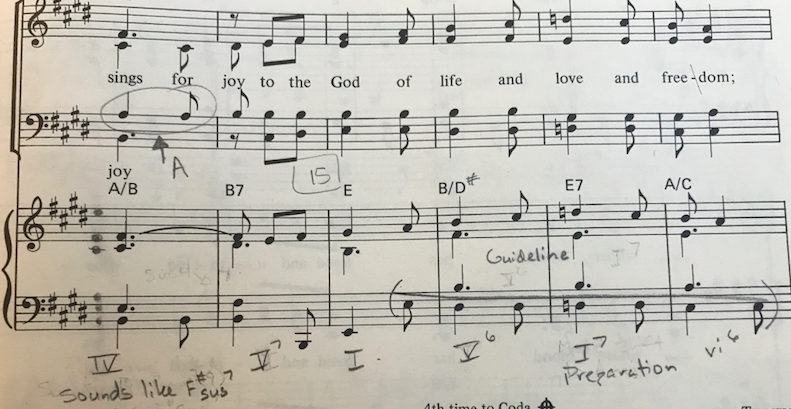
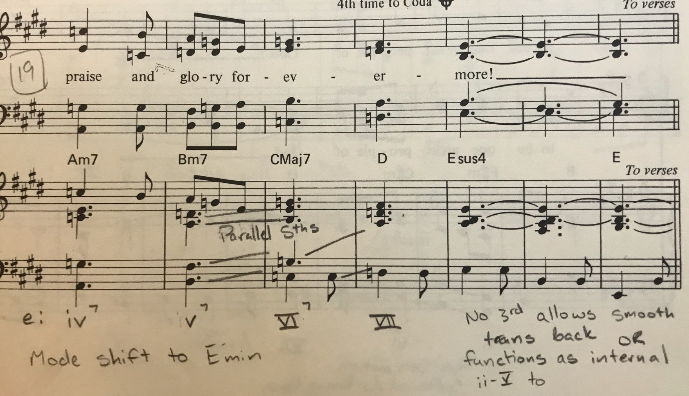
In the introduction, a smooth guide-tone line in the bass ends with a traditional I6/4-V motion, keeping the bass the same between the chords. In the following refrain this motion happens again, but is extended to a complicated pre-dominant motion labeled as [F#m to the slash-chord A/B to B7]. The function of this chord is a bit more complex, however, as the notes of the slash-chord are BEC#F#, which would be scale degrees 2-5-3-6 in the key of A, and makes very little sense, with only the choir tenors having the supposed root of A. I believe this chord is more accurately expressed as [F#min to F#sus7 to B7], which functions as an internal ii-V progression between the ACTUAL ii-V of [F#min to B7]. This takes us neatly back to the tonic of E.
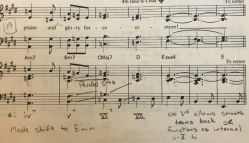
Now, Haugen employs some text painting. The phrase in m15 also begins as Emaj to B/D# (mismarked in the score as B/D). In m17, on the word “love”, there is an E7 chord using the flat 7 as in his Aeolian ‘Kyrie’ in preparation for the upcoming modal interchange. The interchange officially occurs in m19, rounding out the second half of this phrase in E Aeolian. This is the same modal interchange used by Stevie Wonder to color his most emotional lyrics, and several video analyses are available on the subject.
Haugen closes this genre-bending phrase with an early style period element followed by an open-ended jazz sonority. First, Haugen employs the deliberate use of parallel 5ths from m20-21, a stylistic mark of chant from before the year 1350. He then closes on an Esus4 chord, which has neither major nor minor tonality, leaving him free after each refrain to modulate to the verses in three different keys: C# minor, E Aeolian, and E Mixolydian.
There are many more examples of all the above compositional tools throughout this setting, but I’ll end here and allow you to explore on your own if you’re interested. The piece can be purchased at GIA publications in several formats. I used the Vocal/Keyboard/Guitar score for my analysis.
It’s that time of year!
This year’s etudes are a mix of fairly straightforward and quite challenging. I have recordings of each one here, as well as with my suggestions below.
Snare Drum: Cirone, Portraits in Rhythm #21
Every student I work with says something about the tempo on this piece (eighth=184) feeling slow. Cirone himself plays it faster in his example video, but I recommend not straying from the written instructions, especially when the judge is hearing it over and over the same way.
The piece is centered around agogic accents: slight stresses or a sense of direction into the first note of each barred grouping, very much like the placement of dance steps. The first measure, for example is 4+3, whereas the same notes in m3 are 3+4. I suggest playing these flat first for note accuracy, and adding the stresses anywhere it feels natural. Over-use of this type of phrasing can sound really awkward, so keep it subtle and dance-like.
Cirone has many suggestions in the Study Guide edition of the book. They are all fine but none of them are strictly necessary. There are alternate interpretations of all his suggestions which are equally valid.
There are four places I have my own suggestions:
- Rolls in line 3. Cirone says separate them with soft releases. I think that sounds awkward so I roll straight through with agogic stresses. If you can play them separated in a way that is musically satisfying that’s fine too.
- 7/8 groupings in lines 5-6. I use the agogic stress in the first bar with the waltz-like sticking RLRL RLLRL. The last two 16ths pickup in to the next bar. At this point I simplify the stresses and group it as 4 sets of the rhythm (1e&a 2 &). The following 2/8 bar is a long pickup to the 5/8, where I return to the waltz-like feel with the sticking RLRL RLR. I find this keeps things easy to follow but retains the dance quality.
- Short crescendo groupings in lines 6-7. The very next thing that happens. I don’t believe a 3-note crescendo is a thing, that’s just three dynamic targets. I play this passage like rungs on a ladder. Each note is assigned a dynamic 1-5 and I play each note in that place almost like I had it orchestrated to five wood blocks or something. Therefore this passage is played: 12345 135 135 12345 with each number sounding the same each time it’s played.
- The last thing is the 32nd figures at the end of line 8. Cirone famously dislikes “diddles” and always suggests single stroking these passages. I play them as doubles with a little stress to make sure they are equal to the notes around them. They should NOT sound weaker than the surrounding notes, or be mistaken for “inner beats” or “diddles” as in a rudimental style, because that’s out of character for the piece.
Marimba: Stan Dahl Etude #3
This etude is in a Latin/Caribbean style, similar to last year.
The first three lines are a repeated pattern over 4 notes with a little added each time. The 4 notes are all whole steps apart. Practice just the first three bars of each line with a metronome carefully and be able to effortlessly switch between each line. Then do the same for the last measure on each line. Put the whole section together after all of that, transitioning between each element with ease. Put the metronome on every 16th note to clean the rhythm, then on beats 1 and 3 only, then beats 2 and 4 only to check your pulse. Take your time with this section.
The next three lines are a left hand ostinato against a right hand rhythm. Start in m17, playing the full part in each hand by itself. Then play the full part of one hand and just the rhythm of the other hand slowly, then put it all together. The rhythm of the right hand fits the phrase “I like chi-cken with lots of gra-vy and | I like…”, which sounds funny until you do it and it makes complete sense. Once all that is done, go back to m13 and do the additive rhythm as written. The last beat of m20 is slightly different so take note of that.
The next section is a typical roll passage. Learn it by first playing all four notes at once and filling each beat with triplets. That will establish the pacing and shifting between notes, and avoid any “accidental phrasing” later. I recommend ending each four bar phrase with only the first two notes of the triplet to establish a clear break. Once all that is clean and pacing smoothly, do it again with hands alternating 6-tuplets, left hand first. After that, loosen up, listen to the bar sound and play with alternations out of time.
The final section is simpler than it looks. The 7/16 bar rhythm is the first 4 notes of m1. The notes themselves are the same all-whole step pattern, moving up by a half step in each bar. Block them out in 2-note pairs before alternating as written. The paired notes in m39 and m41 are a Major 3rd apart, rising by half step. Block these as before.
m45-48 are all the same G major scale, starting on different notes. Clean it with a metronome on 16ths like in the first section to make sure the rhythm is exactly right.
Timpani: Barry Dvorak Etude #9
This is probably the most difficult etude overall this year. The amount of dynamic control over long passages and the dampening need to keep the sound clean adds a lot of demand to what’s on the page. Fortunately, the second page is a near-mirror of the first.
I recommend the lowest drums: 32″, 29″, 26″
For dampening, the marked spots are mandatory, and in addition to that there are many places where dampening one or more drums will keep the sound clean and allow the higher drums to be heard. Usually notes can be dampened with fingers in the playing spot, however, because of the loud dynamics before many dampened spots, it may be a good idea to dampen to the side by 6 inches or so to prevent buzzing on the head. Don’t dampen harder, as that just makes more noise.
Measures 1-3 require returning to a soft dynamic after a crescendo over and over. Keeping the hands very loose and the fingers open will allow this to happen. Do it slowly to get the gesture down and never apply pressure with closed fingers or the tone will “splat”.
The down beat of m5 is at forte as marked. After that, for the sake of clarity, only the accents remain at forte, the rest of the notes on the low drum are very soft. In m7, on beat 3 the full part returns to forte. It is useful at this time to mark some reference dynamics and dampening to make this long decrescendo work.
- The end of m7 is mf, then decrescendo in the end of m8
- m9 is mp, dampen the low drum at the start, decrescendo at the end
- m10 is p as marked, dampen the low drum at the start
Start m11 on the left hand and do not cross your hands at any point in this measure. Again, dynamics and dampening marks for this long crescendo.
- m11 naturally crescendos down the drums, so play flat until the last beat and crescendo there.
- m12 is mp, dampen the middle drum as you play the bottom drum both times. Crescendo slightly though the last two beats
- m13 is mf, crescendo through the last two beats a lot
- m14 is a big f. Don’t splat the notes. Very loose fingers. Allow the stick to rebound way back up with no resistance from your hand after each note. Dampen the previous note while playing on every beat for clarity.
- m15 is a huge, open, relaxed roll. Because the notes is so low, the roll speed itself is also very slow. Start with a roll speed which is obviously too slow and speed it up until the tone blends to a single sound. Hold the initial dynamic for at least one full count before softening. Spread the hands apart 8 inches or so to help warm the tone.
- m16 center the hands again to get a more articulate sound for the softest notes.
The tuning is weird. Practice singing the “tuning song” F-Bb-Eb going up and then F-D-Ab going down. Sing it a lot and play it on a marimba to really get it solid. I suggest tuning the high F octave off the low drum first.
For the rest of the piece, reverse all your markings, except m29, 30, and 32, where the bottom drum needs to be dampened.
There is a slight edit at the end of my video where I added an extra note and didn’t have time to rerecord. Be careful you don’t do that on the audition!
Crash Cymbals: Aaron Williams Etude #8
This is a tough one. Set a metronome to eighth note = 272 and clean the rhythm of each measure with hand claps before even picking up cymbals.
There are four dynamics indicated. f should be comfortable, as it requires the most dampening and needs room for accents. mf is a mellow version of the same thing. p is very light with an emphasis on moving slow for a low tone. The ff in the last bar needs to be deeper than f for an obvious contrast.
Tambourine: Aaron Williams Etude #8
Tricky dynamics. I look at them more as accents than dynamics, and that makes it easier to see what to do. First of all, set yourself up with a stand between you and the judge so the loud/soft roll effects at least seem to work a little better.
Starting in m3 I rest the tambourine on my knee and play directly opposite where it touches. This reduces the sound the most for a stable, low pp. I then play the f notes in bars 3-4, and 7-9 with an Up/Down motion from hand to knee, sticking to my knee at the end to set up the next pp note.
The finger roll in m5-6 is a bit misleading. There is no way the ff on that roll will match the ff from bar one, so don’t try. SHOW a big start to the roll and hold that big tone before lowering the dynamic as you lower the tambourine to your leg. It’s very helpful to put marks along the edge of the rim so you know where to start, how many marks you cover before reducing your dynamic, and where to end. This builds in an element of consistency which is often overlooked.
The shake roll in m10 is also a bit misleading. It’s really hard to start a shake roll soft. Get a good tone and SHOW the dynamic by starting low and raising the tambourine through the crescendo. The stand blocking or appearing to block some of the sound helps this to work.
m12 to the end is really fast. If you can play all the 16ths with a fast single stroke that’s fine. If you need to use a knee/fist thing that’s fine. I use a heel/toe/toe type motion I developed from conga and pandiero playing. It works great for me but I can’t recommend one method over another. You need to experiment. I accelerate my accent in m14 for more impact and then open my hand to slap the last note. The slap could be a closed knuckle knock as well.
Good luck on auditions! I hope this is helpful. I’m always happy to answer any questions, just ask!
No matter the instrument’s quality, a triangle is only at it’s best with a good clip.
I recently was reminded of this by none other than Neil Grover. If you don’t know, Neil Grover is a legendary orchestral musician and a revolutionary teacher and instrument maker. His YouTube page, GroverProPerc, is a treasure trove of orchestral goodies.
Many companies have clips that are a good balance of price and features, but if price is no problem the Stubbs Triangle Clip is, in my opinion, the very best for one simple reason: Vibration Isolation.

I use these clips a lot, and find I want this level of isolation in other areas of my work as well. I use triangles and other hanging effects on marching band frames, in musical theatre pits, chamber music, etc., and developed over the past few years an inexpensive way to approach the level of isolation I so value from my Stubbs clips.
The materials are cheap and easy to obtain: Rubber tubing, fishing line, and moleskin. For about $30 you can obtain a lifetime supply. Rubber tubing is near plumbing supplies in any hardware store, fishing line is available in any sporting goods store. Moleskin is used in shoes for protecting blisters and can be found in any pharmacy or grocery store.
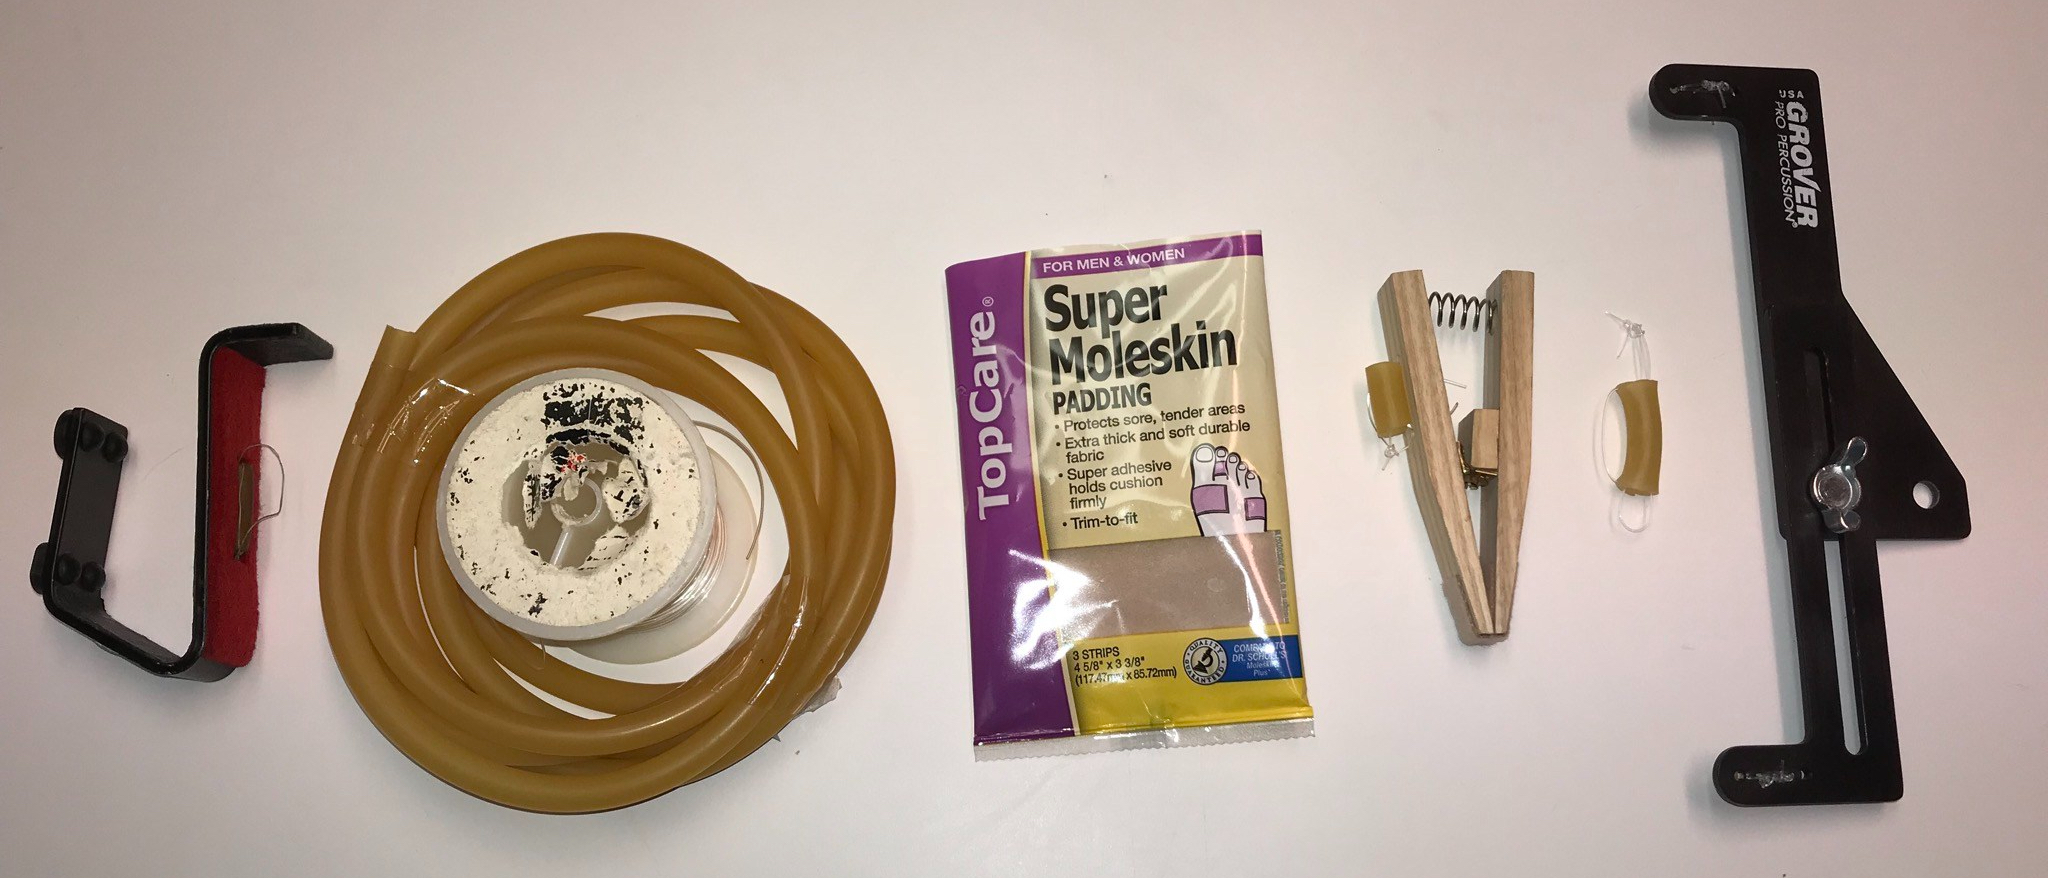
To improve an inexpensive clip like this one, or another mount:
- Cut off the current strings
- Cut a length of tubing that fits between the two holes in the clip
- Tie it to the clip with fishing line (needs to be tight)
- Tie an additional line to only the tubing to hold the triangle
- Cover the ends of the clip where they touch the stand with moleskin
Fishing line doesn’t always tie like string. Tying the tubing to the clip with three half-hitches should be fine. Tying the holder for the triangle is different. Cut a length that seems too long and pull one end through the tubing. Hold the two ends together and tie a single knot so you have a loop. If you can hang a triangle at this point to adjust the length of the knot it’s a good idea. Tie an additional 1-2 half hitches to lock that knot in place and trim the ends.


To make a hanger for a cymbal stand or hook:
- Cut a short piece of tube and tie a hanger as above
- Tie another loop long enough to go all the way through with an inch sticking out each side. Push it through the tubing.
- Hang the holder by both loops


These last a long time and seriously improve the sound of a triangle. They also reduce or eliminate the noise a frame might make from the transferred vibrations of the triangle, which is a major issue with close microphones and rattle-prone marching frames or music stands.
Let me know if this helps you! I love these kinds of low-cost innovations, and would love to hear about any you came up with as well!